How to Open NPS Account Online in India: 2026 Step-by-Step
Shlok Sobti

How to Open NPS Account Online in India: 2026 Step-by-Step
You want to start building a retirement corpus but opening an NPS account feels overwhelming. Between choosing the right platform, figuring out which documents you need, and navigating multiple portals, the process can seem far more complex than it should be. Most people get stuck before they even begin, unsure whether to use the eNPS portal directly or go through their bank.
The good news is that you can open NPS account online in under 20 minutes from your phone or laptop. The Pension Fund Regulatory and Development Authority (PFRDA) has made online registration straightforward through authorized platforms. You need your Aadhaar, PAN, and bank details to get started, and the minimum initial contribution is just ₹500 for Tier I.
This guide walks you through every step of the online NPS account opening process in 2026. You'll learn which platform suits your needs, what documents to prepare, how to complete registration without errors, and what to do after you receive your Permanent Retirement Account Number (PRAN). By the end, you'll know exactly how to set up your account and start investing for retirement.
What is NPS and who can open it online
The National Pension System (NPS) is a government-backed retirement savings scheme regulated by the Pension Fund Regulatory and Development Authority (PFRDA). You contribute regularly during your working years, and these contributions grow through market-linked investments managed by professional fund managers. At retirement (age 60), you can withdraw a portion as a lump sum while the rest goes into an annuity that provides monthly pension income.

NPS offers tax benefits under Section 80CCD(1B), allowing an additional deduction of ₹50,000 over and above the ₹1.5 lakh limit under Section 80C.
Eligibility criteria for online registration
Any Indian citizen between 18 and 70 years can open nps account online, whether you're a salaried employee, self-employed professional, or business owner. Non-Resident Indians (NRIs) and Overseas Citizens of India (OCIs) can open Tier I accounts but not Tier II accounts. You must be mentally capable of entering into a contract under Indian law.
Hindu Undivided Families (HUFs) and Persons of Indian Origin (PIOs) cannot open NPS accounts. You need valid KYC documents (Aadhaar and PAN) to complete online registration. Both resident and non-resident Indians qualify, but the platform verifies your citizenship status during signup through Aadhaar-based authentication for residents.
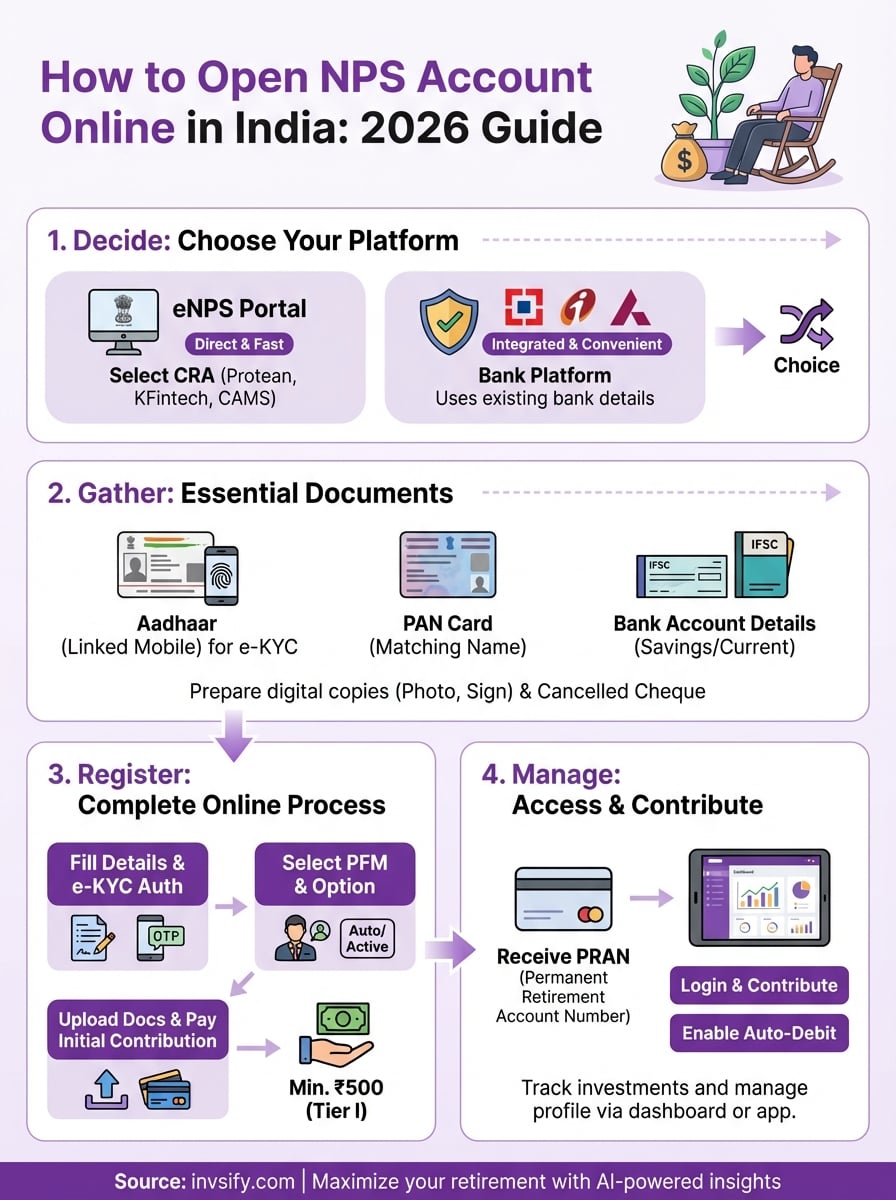
Step 1. Decide how you want to open your NPS
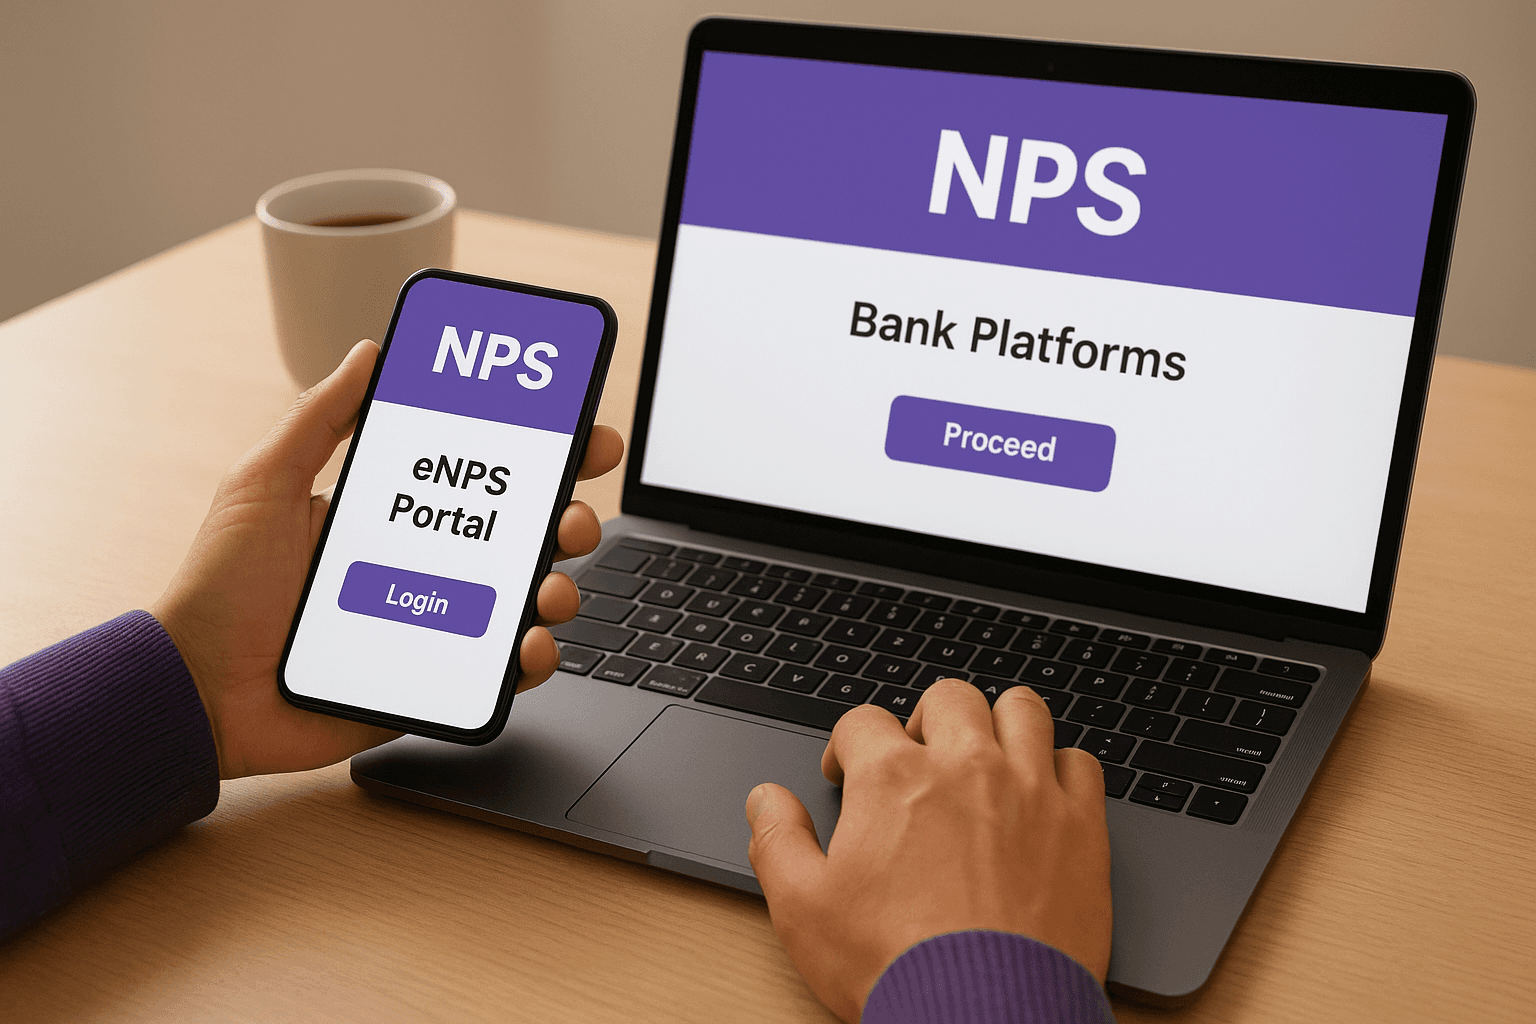
You have two main routes to open nps account online: the official eNPS portal or through authorized bank platforms like HDFC, ICICI, or Axis Bank. The eNPS portal connects directly to one of three Central Recordkeeping Agencies (CRAs) that manage NPS accounts, while bank platforms provide a more familiar interface if you already use their services. Your choice depends on whether you prefer a direct government portal or want to keep everything under your existing bank's dashboard.
Choose between eNPS portal and bank platforms
The eNPS portal gives you direct access without middlemen and typically processes your PRAN faster. You select your preferred CRA during registration and complete the entire process through their platform. Bank platforms like HDFC NetBanking or ICICI Bank integrate NPS with your existing account, making contributions easier through auto-debit. If you value speed and don't mind navigating a government portal, use eNPS. If you prefer convenience and already bank online, use your bank's platform.
Bank platforms often pre-fill your KYC details from your existing account, reducing the information you need to enter manually.
Pick your Central Recordkeeping Agency (CRA)
You must choose one of three CRAs when you open nps account online: Protean (formerly NSDL e-Governance), KFintech (K-Fin Technologies), or CAMS. These agencies maintain your account records, generate your PRAN, and handle all transactions. All three CRAs offer identical services and charge the same fees, so your choice comes down to interface preference and service experience. Most people select Protean because it was the original NPS recordkeeper and processes the highest volume of accounts, but KFintech and CAMS work equally well for account management and contributions.
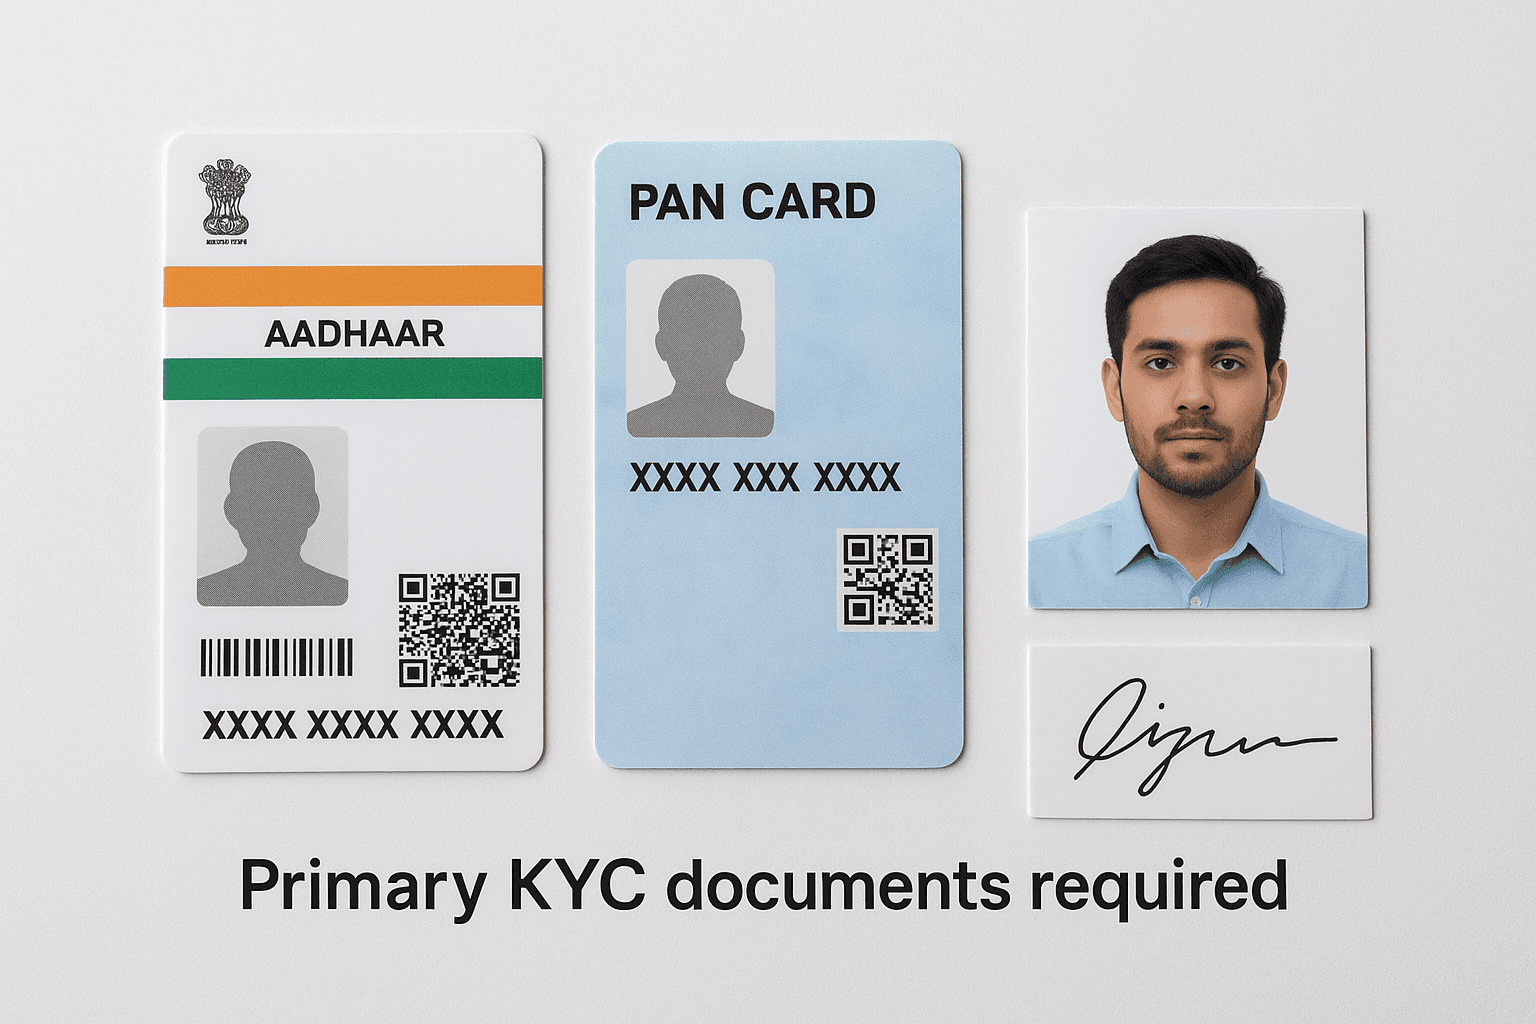
Step 2. Gather KYC documents and account details
You need Aadhaar and PAN cards ready before you start the registration process to open nps account online. The platform verifies your identity through Aadhaar-based e-KYC, which pulls your details directly from the UIDAI database and eliminates physical document submission. Your PAN card serves as proof of identity and enables tax benefits tracking. Additionally, you need your bank account details for contribution setup and a passport-size photograph along with your digital signature (you can create these by taking clear pictures with your phone).
Primary KYC documents required
Your Aadhaar number and the mobile number linked to Aadhaar form the foundation of online registration. The system sends an OTP to your Aadhaar-linked mobile during verification, so confirm your phone number is updated in the UIDAI database before you begin. Your PAN card must match the name on your Aadhaar exactly, or the system rejects your application.
If your Aadhaar and PAN show different names, visit the Income Tax or UIDAI website to correct the mismatch before attempting NPS registration.
Keep digital copies of these documents ready:
Scanned Aadhaar card (front and back, max 2MB file size)
Scanned PAN card (clear copy showing all details)
Passport-size photograph (recent, with white background, JPEG format)
Digital signature image (sign on white paper, photograph it, save as JPEG)
Cancelled cheque or bank statement (showing your name, account number, and IFSC code)
Bank account details for contributions
You must provide your bank account number, IFSC code, and branch details during registration. The platform verifies your bank account by matching your name across Aadhaar, PAN, and bank records. Use a savings or current account in your name; joint accounts or accounts held by others are not acceptable for NPS contributions.
Your bank account receives withdrawal amounts and processes monthly contributions through auto-debit if you enable it. Write down your 9 to 18-digit account number and 11-character IFSC code (found on your cheque or passbook) before starting registration to avoid errors.
Step 3. Complete registration on the platform
Once you have your documents ready, open the eNPS portal or your bank's NPS section and click on the registration or new subscriber option. The system displays a multi-step form that collects your personal information, investment preferences, and KYC details. Complete each field carefully because errors delay your PRAN generation or trigger rejection at the verification stage. The entire registration process takes 15 to 20 minutes if you have all information prepared in advance.
Navigate to the registration page and fill basic details
Visit the Protean eNPS portal (enps.nps-proteantech.in), KFintech NPS website (nps.kfintech.com), or CAMS NPS platform (camsnps.in) depending on your CRA choice. Click "New Registration" or "Register Now" to start. The first screen asks for your Aadhaar number and the mobile number linked to it. Enter these details and click "Generate OTP" to receive a six-digit code on your phone.
After OTP verification, the form requests your PAN number, full name (as per Aadhaar), date of birth, gender, and email address. Fill these fields exactly as they appear on your official documents. The system auto-populates some fields from your Aadhaar data, but verify everything before proceeding. Select your marital status, occupation type (salaried, self-employed, business, etc.), and correspondence address from the dropdown menus.
The system rejects applications where your name spelling differs across Aadhaar, PAN, and bank records, so triple-check these fields before submission.
Complete Aadhaar verification and select investment preferences
The next screen initiates Aadhaar-based e-KYC authentication. You receive another OTP on your Aadhaar-linked mobile to authorize data retrieval from UIDAI. Enter the OTP within the time limit (usually 3 minutes) and click "Authenticate". The system confirms successful verification with a green checkmark.
Now choose your Pension Fund Manager (PFM) from the list of PFRDA-approved fund managers like SBI Pension Funds, HDFC Pension Management, or LIC Pension Fund. Select between "Auto Choice" (where allocation adjusts automatically based on your age) and "Active Choice" (where you decide equity, corporate bonds, and government securities percentages yourself). Most first-time investors pick Auto Choice because it reduces decision complexity.
Upload documents and make initial contribution
Upload your scanned documents in the specified formats (usually JPEG or PDF under 2MB each). The system asks for your PAN copy, photograph, signature image, and cancelled cheque or bank statement. Use clear, readable scans because blurry images trigger resubmission requests. Enter your bank account number, IFSC code, and account type (savings or current) in the bank details section.
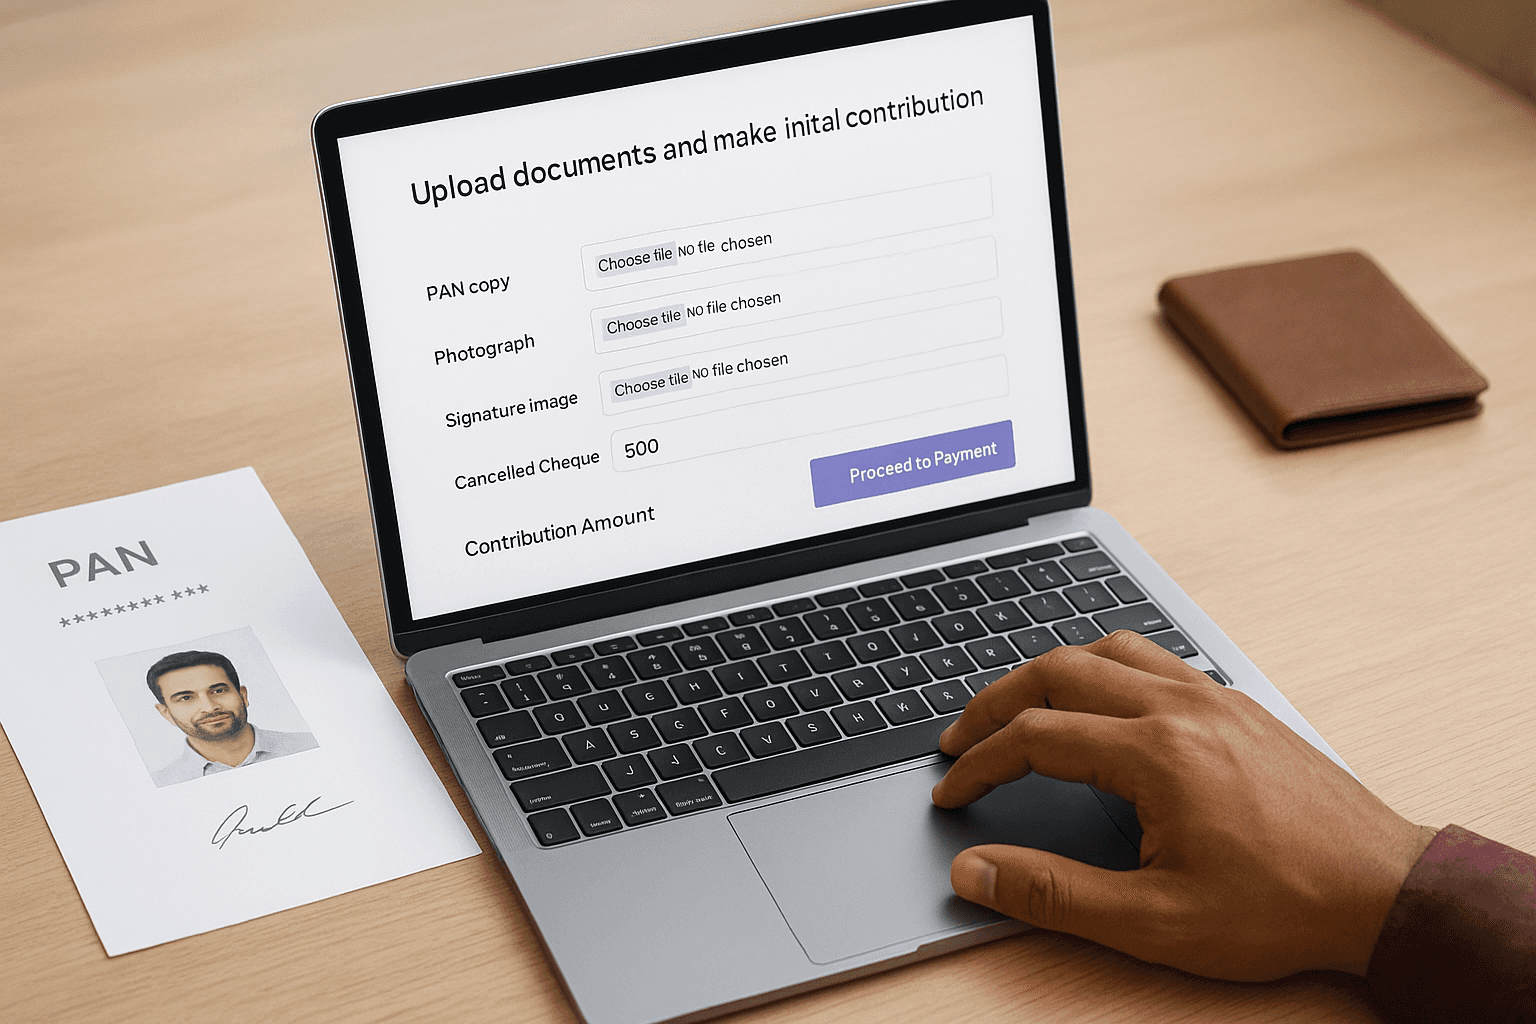
The final screen displays the contribution amount field. Enter at least ₹500 for Tier I (the mandatory account) to open nps account online successfully. You can also activate Tier II (optional savings account) by contributing a minimum of ₹1,000 simultaneously. Click "Proceed to Payment" to reach the payment gateway where you complete the transaction through net banking, debit card, or UPI. After successful payment, the system generates your 12-digit PRAN instantly and sends it to your registered email and mobile number.
Step 4. Log in, contribute and fix common issues
After you receive your PRAN via email and SMS, you gain access to your NPS account dashboard where you manage contributions, view holdings, and update preferences. Your PRAN serves as your permanent account identifier across all NPS platforms, so save it securely. The CRA sends you a welcome kit with login credentials (your PRAN and a temporary password called IPIN) within 3 to 5 days of registration, though you can log in immediately using the credentials provided during the registration confirmation.
Access your account for the first time
Visit your CRA's login portal (the same platform where you completed registration) and click "Login with PRAN" or "Subscriber Login". Enter your 12-digit PRAN and the IPIN (temporary password) provided in your registration confirmation email. Complete the captcha verification and click "Submit" to access your dashboard. The system prompts you to change your IPIN immediately on first login for security. Choose a strong password with a mix of letters, numbers, and special characters, then confirm it.
If you forgot your IPIN before logging in, click "Reset Password" on the login page. Select the "via OTP" option, enter your PRAN and date of birth, and choose whether to receive the OTP on your registered mobile or email. Enter the OTP, set a new password, and complete the captcha to regain access.
Make additional contributions
Your dashboard displays options to contribute to Tier I, activate Tier II, or enable auto-debit for monthly investments. Click "Contribute Online" and select the account type (Tier I or Tier II) you want to fund. Enter the contribution amount (minimum ₹500 for Tier I, no minimum for subsequent Tier II contributions) and select your payment method. The platform redirects you to a payment gateway where you complete the transaction through net banking, debit card, or UPI.
Set up auto-debit to ensure consistent retirement savings without manual intervention each month.
Contributions reflect in your account within 2 to 3 business days after successful payment. You can view transaction history and generate account statements directly from the dashboard to track your investment growth.
Resolve common registration problems
Your registration might fail if your Aadhaar mobile number differs from the one you entered or if your PAN and Aadhaar names don't match exactly. Update your mobile number in the Aadhaar database through the UIDAI website before retrying registration. Visit the Income Tax e-filing portal to correct name mismatches between PAN and Aadhaar records.
Payment failures occur when you exceed daily transaction limits or use incompatible payment methods. Check your bank's net banking limits and retry the payment, or use a different payment option like UPI. If your PRAN doesn't arrive within 24 hours despite successful payment, contact your CRA's helpline with your acknowledgment number (provided during registration) to track your application status.
Make your NPS work for you
You now know exactly how to open nps account online in 2026, from choosing your platform to making your first contribution. The process takes under 20 minutes with your Aadhaar, PAN, and bank details ready, and you can start building your retirement corpus with just ₹500. Your PRAN gives you lifetime access to track investments, adjust fund allocation, and contribute whenever you want.
Beyond NPS, your overall wealth strategy needs regular monitoring and optimization across all investments. Invsify's AI-powered advisory analyzes your entire portfolio, identifies hidden fees that eat into returns, and provides conflict-free recommendations that traditional distributors can't match. You get 24/7 access to financial insights, personalized wealth tracking, and expert guidance that helps you maximize every rupee you invest for retirement and beyond.
