Start NPS Account Online In India: Paperless eNPS Sign-Up
Shlok Sobti

Start NPS Account Online In India: Paperless eNPS Sign-Up
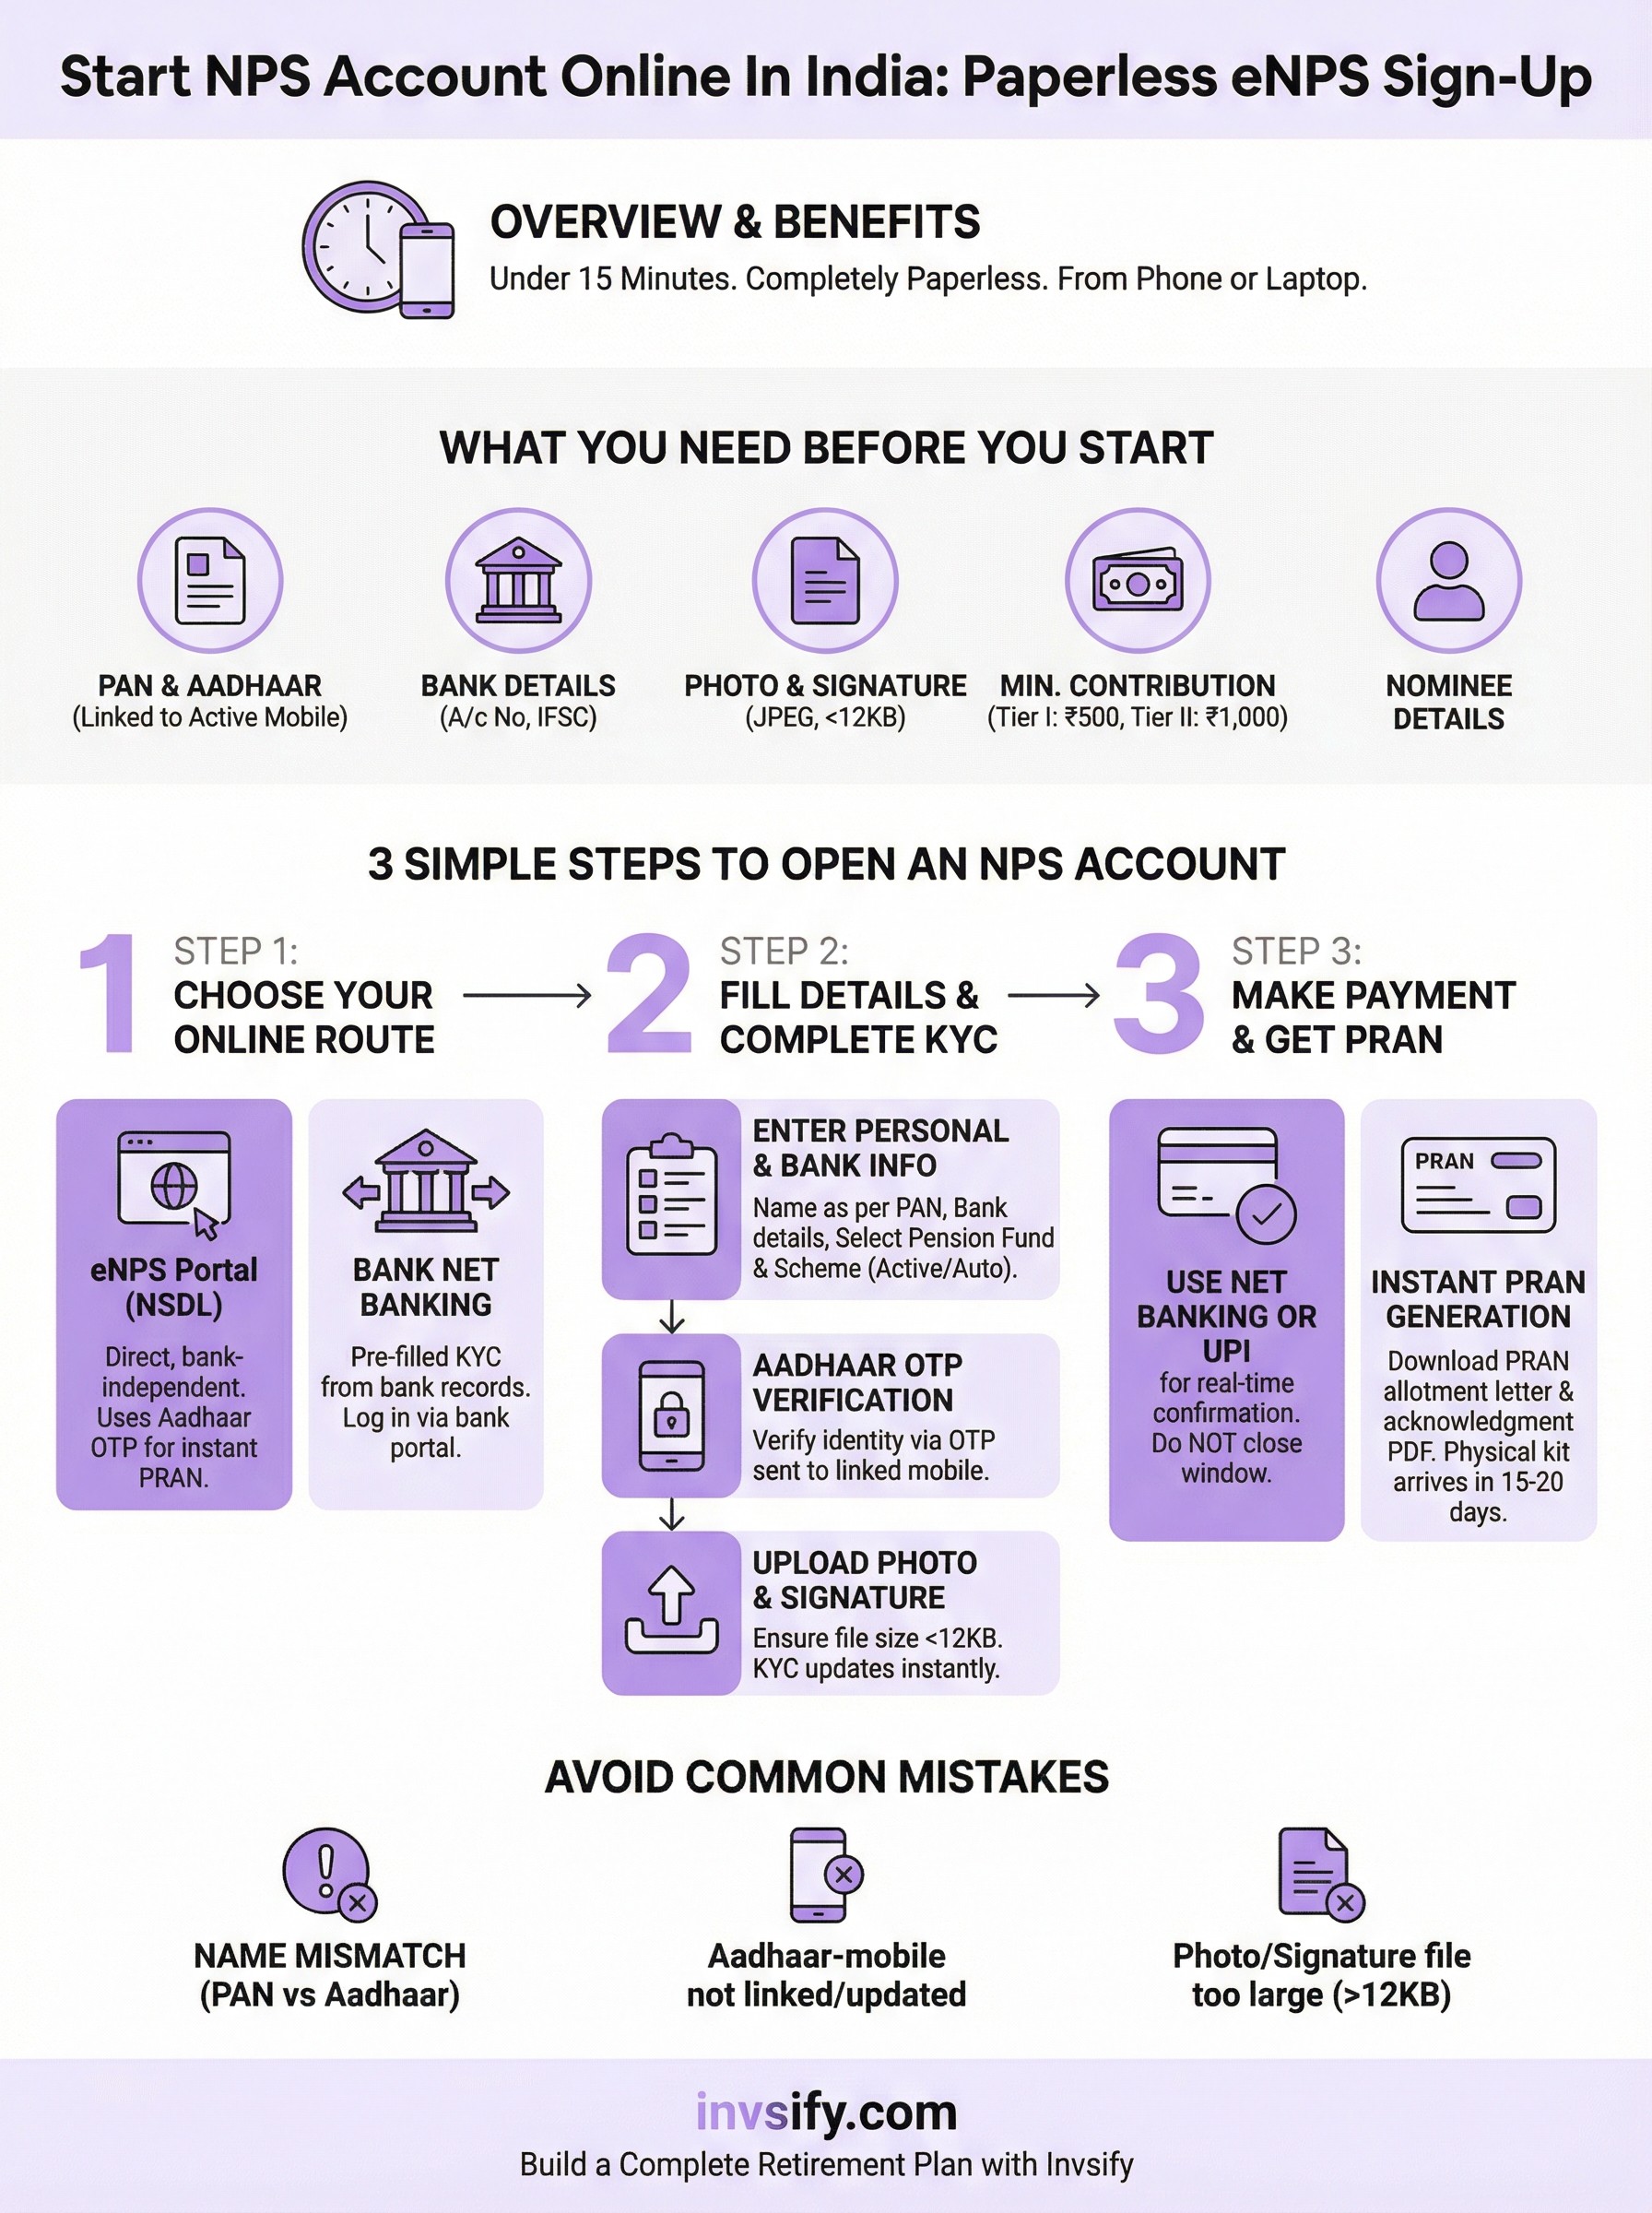
Opening an NPS account used to mean visiting a Point of Presence, filling out physical forms, and waiting days for your PRAN to arrive. Not anymore. You can now start NPS account online through the eNPS portal in under 15 minutes, completely paperless, from your phone or laptop.
The process is straightforward, but small missteps during registration, wrong PAN details, Aadhaar-mobile linking issues, or picking the wrong pension fund, can delay things or cost you over time. Getting it right the first time matters, especially when your retirement corpus is at stake and every year of compounding counts toward a meaningful difference at 60.
This guide walks you through the exact steps to open your NPS account online via the eNPS portal, covering both Tier I and Tier II accounts, KYC verification, and instant PRAN generation. At Invsify, we help salaried individuals across India make smarter, conflict-free investment decisions, and knowing how NPS fits into your broader wealth plan is a critical piece of that puzzle.
What you need before you start
Before you start NPS account online, gathering everything upfront saves you from dropping off mid-registration. The eNPS portal times out sessions, so incomplete information means starting over from scratch. Having all your documents ready and your phone nearby makes the process smooth and fast.
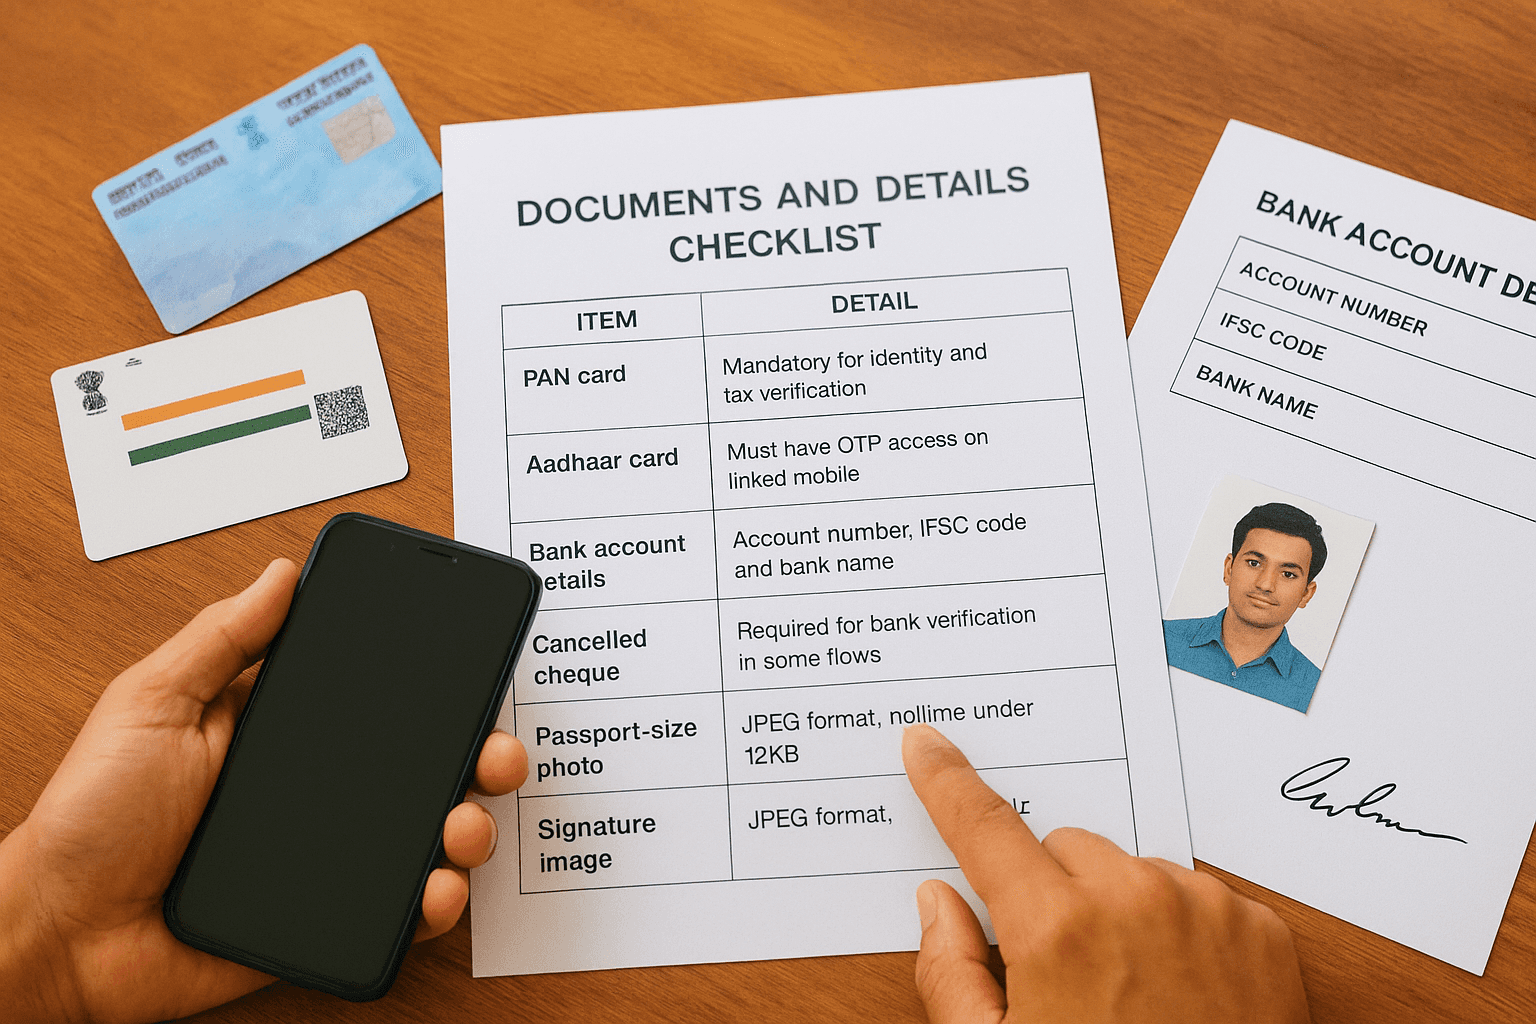
Documents and details checklist
You need a specific set of documents and personal details to complete registration without any interruption. Your Aadhaar number must be linked to your active mobile number because the portal sends an OTP to verify your identity in real time. Without this link, Aadhaar-based KYC fails and you will need to use the offline KYC route instead, which adds days to the process.
If your Aadhaar is not linked to your current mobile number, update it at your nearest Aadhaar enrollment center before starting registration.
Here is everything you need to keep handy before you begin:
Item | Detail |
|---|---|
PAN card | Mandatory for identity and tax verification |
Aadhaar card | Must have OTP access on linked mobile |
Bank account details | Account number, IFSC code, and bank name |
Cancelled cheque | Required for bank verification in some flows |
Passport-size photo | JPEG format, file size under 12KB |
Signature image | JPEG format, file size under 12KB |
Nominee details | Full name, date of birth, and relationship |
Eligibility and account conditions
Eligibility for an NPS account is straightforward: you must be an Indian citizen between 18 and 70 years of age. Non-Resident Indians can also open accounts through eNPS, though the documentation steps differ slightly compared to resident Indians.
Both your email address and mobile number must be active and accessible during registration because the portal sends verification codes to both. Make sure you are not using a shared or outdated number. For salaried individuals, your employer's NPS registration status does not block you from opening an individual Tier I account independently.
A minimum first contribution of Rs. 500 activates your Tier I account, while Tier II accounts require Rs. 1,000 to open. Keep your net banking or UPI ready so payment clears instantly and your PRAN generates without delay.
Step 1. Choose your online NPS route
When you decide to start NPS account online, your first decision is which platform to use. Two main routes exist: the eNPS portal managed by NSDL and your bank's net banking portal if your bank is registered as an NPS Point of Presence. Both paths lead to the same result, a valid PRAN and an active NPS account, but the steps and convenience level differ depending on your situation.
Choose the eNPS portal if you want a fully independent registration that is not tied to any specific bank.
The eNPS portal route
The eNPS portal at enps.nsdl.com is the direct, bank-independent option and works for the majority of individual investors. You register using either Aadhaar-based OTP verification or a PAN-based offline KYC process. The Aadhaar route is faster and generates your PRAN instantly after your payment clears. Pick this route if your Aadhaar is linked to your current mobile number and you want to complete everything in a single session without switching between platforms.
The bank net banking route
Several major banks, including SBI, HDFC, ICICI, and Kotak, allow you to open your NPS account directly through their net banking portals. Your KYC details are pre-filled using your existing bank records, which reduces the time you spend entering information manually. This route suits you well if you already bank with an NPS-registered POP and prefer managing everything under one login. Your PRAN generates instantly once your first contribution payment goes through.
Step 2. Fill details and complete KYC
Once you select your route to start NPS account online, the portal takes you to a multi-step registration form. Work through each screen carefully because the system validates your PAN and Aadhaar details against government databases in real time. Errors in name spelling or date of birth cause the verification to fail and force you to restart.
Enter your personal and bank details
The first set of screens collects your personal information, contact details, and bank account data. Enter your name exactly as it appears on your PAN card, including initials and spacing. Any mismatch between your PAN and Aadhaar records will block the KYC step entirely. Fill in your bank account number, IFSC code, and nominee details before moving forward.
Here is what the portal asks you to fill in during this stage:
Full name (as per PAN)
Date of birth
Mobile number and email address
Bank account number and IFSC code
Nominee name, relationship, and date of birth
Pension fund manager selection
Investment scheme preference (Active or Auto)
Complete Aadhaar OTP verification
After submitting your personal details, the portal triggers an OTP to your Aadhaar-linked mobile number for identity verification. Enter the OTP within the time limit shown on screen, typically 10 minutes. Once the OTP clears, upload your photo and signature as JPEG files within the size limits noted in the checklist. Your KYC status updates immediately after a successful upload.
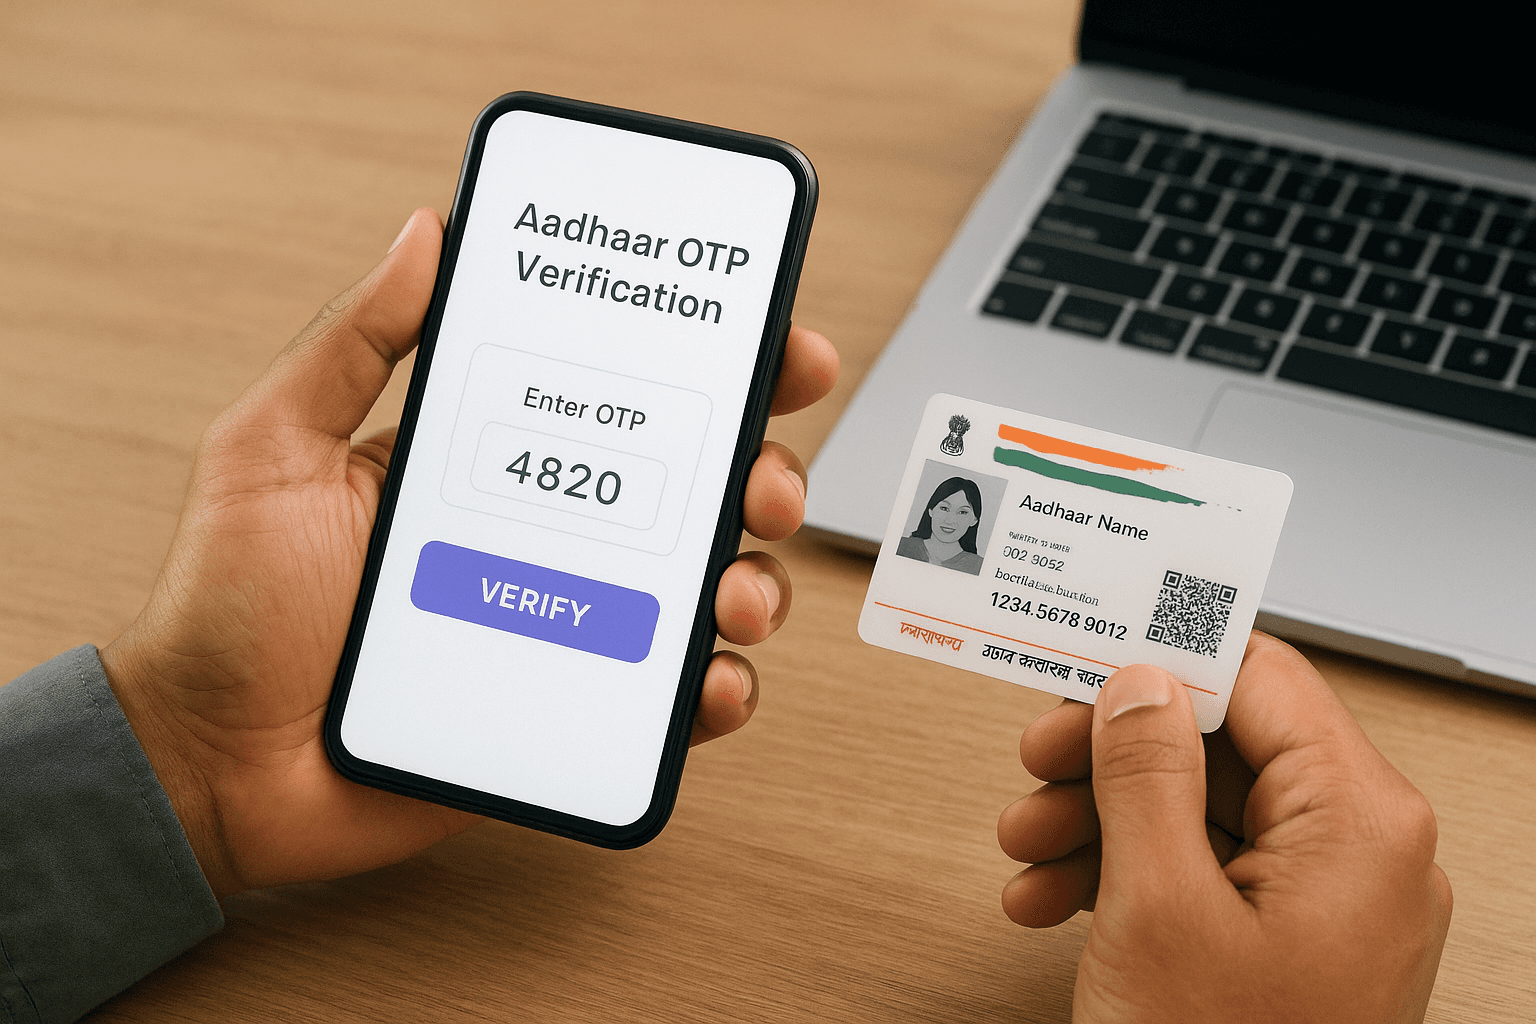
Double-check your photo and signature file sizes before uploading; files above 12KB will be rejected without warning.
Step 3. Make payment and get your PRAN
After your KYC clears, the portal moves you to the payment screen, which is the final step before your PRAN generates. This is where many people who start NPS account online get stuck because they use payment methods that do not process instantly. Only use net banking or UPI at this stage to guarantee real-time payment confirmation and same-session PRAN generation.
Choose your payment method
Your payment options on eNPS include net banking, UPI, and debit card, though debit card processing can take longer to confirm depending on your bank's gateway. For Tier I, your minimum first contribution is Rs. 500. For Tier II, it is Rs. 1,000. Enter the amount, select your payment method, and complete the transaction without closing or refreshing the browser window.
Once payment is initiated, do not press the back button or close the tab. Doing so can deduct the amount while leaving your registration incomplete.
Here is a quick reference for minimum contributions:
Account Type | Minimum First Contribution | Minimum Annual Contribution |
|---|---|---|
Tier I | Rs. 500 | Rs. 1,000 |
Tier II | Rs. 1,000 | No minimum |
Download your PRAN and acknowledgment
Once your payment confirms successfully, the portal generates your PRAN instantly and displays it on screen. Download the PRAN allotment letter and acknowledgment receipt immediately as a PDF. Your physical PRAN kit arrives by post within 15 to 20 working days, but your account is active and usable from the moment the PRAN generates.
Fix common issues and avoid mistakes
Even when you follow every step correctly, certain issues come up repeatedly when people try to start NPS account online. Most problems fall into two categories: KYC verification failures and payment processing errors. Recognizing these ahead of time saves you from restarting the entire process.
Aadhaar and KYC failures
The most common reason KYC fails is a name mismatch between your PAN and Aadhaar records. Even a single extra space or a missing initial causes the system to reject verification. Check both documents side by side before entering any details. If your Aadhaar-linked mobile number has changed since you last updated it, your OTP will not arrive on your current phone and registration will stall completely.
Update your Aadhaar mobile number at an enrollment center before attempting eNPS registration if you have switched numbers.
Here are the most frequent KYC errors and how to fix them:
Error | Fix |
|---|---|
Name mismatch (PAN vs Aadhaar) | Correct name on PAN via NSDL or update Aadhaar via UIDAI |
OTP not received | Update mobile number linked to Aadhaar before retrying |
Photo or signature rejected | Compress JPEG files to below 12KB before uploading |
Session timeout | Keep all documents open and complete in one sitting |
Payment and PRAN delays
If your payment goes through but the PRAN does not generate, do not make a second payment. Check your registered email inbox within 24 hours because the portal sends a PRAN confirmation separately if the session drops after a successful transaction. Contact the NSDL helpdesk with your payment reference number if no confirmation arrives.
Wrap up and next steps
You now have everything you need to start NPS account online without confusion or delays. The process comes down to three things: having your documents ready before you begin, entering your PAN and Aadhaar details exactly as they appear on your official records, and completing payment in a single session using net banking or UPI. Follow those three principles and your PRAN generates the same day.
Opening your NPS account is a strong first step, but it is only one part of a complete retirement and wealth plan. Your asset allocation, pension fund manager choice, and how NPS fits alongside your mutual funds, PPF, and tax-saving instruments all determine how well your money compounds over the next 20 to 30 years. Getting that broader picture right takes more than a government portal.
Talk to an advisor at Invsify to build a conflict-free, personalized investment strategy around your NPS account and long-term financial goals.
